Home |
Previous Page | Next Page Defining Device Arrays > Device Arrays >
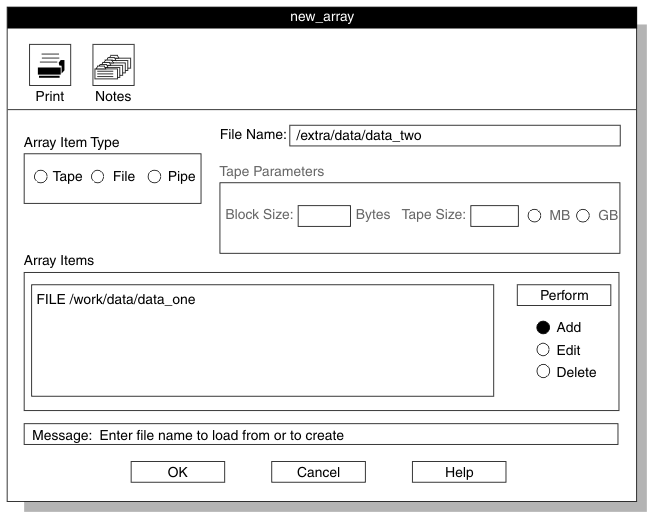
Use the device-array definition window (Figure 50) to add, edit, or delete devices from an array.
Figure 50. A Partially Completed Device-Array Definition Window
Array Item Type Group
The Array Item Type group lists
the types of devices that
you can include in a device array. You can mix different types of
devices in a single array.
Device Text Box
Depending on the array item type that you selected from
the Array Item Type group, the label for the
text box where you type a device name is Tape Device, File Name,
or Pipe Command (UNIX only). Fill in
this text box as follows.
- Device Type
- What to Type
- Tape Device
- The full pathname of the tape device (example: /dev/rmt/0)
- File Name
- The full pathname of the file (example: /work/mydata)
- Pipe Command
- The full pathname of the executable pipe command or shellscript (example: /tmp/g)
Tape Parameters Group
When you select Tape as the array item type, the Tape Parameters group
becomes active (not gray), as Figure 51 shows.
You must type the block and tape size. The tape size must be greater
than zero. The example shown in Figure 51 is for UNIX. An example of a tape device name
for Windows is: 11.1tape0.
Figure 51. The Tape Parameters Group
Windows Only
Windows does not support remote tape load and unload.
End of Windows Only
To add devices to the device array
- Click Add in the device-array definition
window.
-
Click the device type in the Array Item Type group.
- Type the full pathname of the device in the Device text box.
- If you specified a tape device, the Tape Parameters group
becomes active, as Figure 51 shows.
- Type the block size in kilobytes.
- Click MB (megabytes) or GB (gigabytes)
to specify the units to use for the tape size.
- Specify the tape size.
-
When you have included all of the information
for the device, click Perform.
The device that you added appears in the Array Items list
box.
- Repeat steps 2 through 5 to add other items to
the device array.
- When you have added all of the devices to the array, click OK to
return to the Device-Array Selection window.
Your new array appears in the Current Arrays list
box.
- Click Cancel to return to the HPL main
window.
To
edit a device in the device array
- Click Edit in the device-array definition
window.
-
Select a device from the Array Items list
box.
The selected item appears in the Device text box.
- Edit the pathname and tape parameters, as appropriate.
- Click Perform.
- Click OK to return to the Device-Array
Selection window.
- Click Cancel to return to the HPL main
window.
Tip:
When you edit a device, you can change the pathname and
the tape parameters, but you cannot change the array-item type (tape,
file, pipe). If you need to change the device type, you must delete
the item and then add a new item.
To delete a device from the device array
- Click Delete in the device-array definition
window.
- Select a device from the Array Items list
box.
- Click Perform.
- Click OK to return to the Device-Array
Selection window.
- Click Cancel to return to the HPL main
window.
Home |
[ Top of Page | Previous Page | Next Page | Contents |
Index ]