The windows for creating or modifying components often (but not always) come in pairs. The first window, the Component-Selection window, lets you create a new component or select an existing component to modify. This window also lets you view notes and copy, delete, or print information about a component. The second window, the Component-Definition window, lets you make the actual changes.
The details of a selection window vary depending on the operation that you are performing. However, the Component-Selection windows have the following standard features:
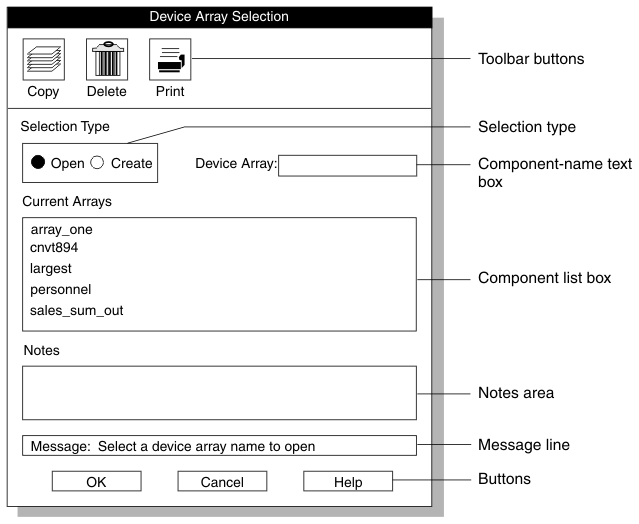
Figure 29 shows the Device Array Selection window to illustrate the standard features of Component-Selection windows.
The buttons across the top of the display represent actions that you can take after you select a component from the component list. For example, in Figure 29 (the Device Array Selection window), the toolbar buttons indicate that you can copy, delete, or print an array. Using the HPL Buttons explains how to use these buttons.
The selection type allows you to specify the action that you want to take. In most of the displays, you can either open an already existing component or create a new component.
If you click Create, you must type a name for the new component in the Device-Array text box. (In Figure 29, you must give a name for the new device array.)
Before you can type a name in the Device Array text box, you must click inside that text box to activate it. When the text box is active, it has a narrow black border. If you type a character that is not valid, the interface beeps at you, displays a message on the message line, and refuses to display the invalid character.
The component list box lists the components that currently exist in this project. If you click Open in the selection group, you must select a component from this list.
The notes area displays stored comments about the selected component. This area is not an active area. To store a comment about a component, you must select a component and use the Notes button. For more information about notes, see Notes Button.
The message line primarily gives instructions for the next logical action. The message line also gives an error message when an action fails or a completion message when a process is finished.
The buttons across the bottom of the display let you indicate your next action. For a more complete discussion, see Using the HPL Buttons.
Home | [ Top of Page | Previous Page | Next Page | Contents | Index ]